Introduction
Programming and debugging ARM processors can be done using the Serial Wire Debug protocol, which is an extension to the JTAG protocoal. For this, there are several commercial JTAG adapters available, but there are more budget friendly alternatives available. Next to for example the FTDI adapter described here, an even simpler solution is available, but just using the popular Raspberry Pi as SWD JTAG adapter. The big advantage using an SBC like this, is that there is no additional link between the adapter and host computer (usually via usb), but the mcu is programmed directly using the GPIO on the SBC itself. The Serial Wire Debug interface lends itself in simplicity, as it only uses 4 wires to connect to the arm processor:
- GND: the ground connection
- nSRST: system reset
- SWDIO: the bi-directional data signal between the programmer/debugger and target mcu
- SWCLK: the SWD clock signal for the SWDIO signals
in this tutorial, the example is based on the Raspberry Pi Zero, connected to a STM32F051 via the swd interface:
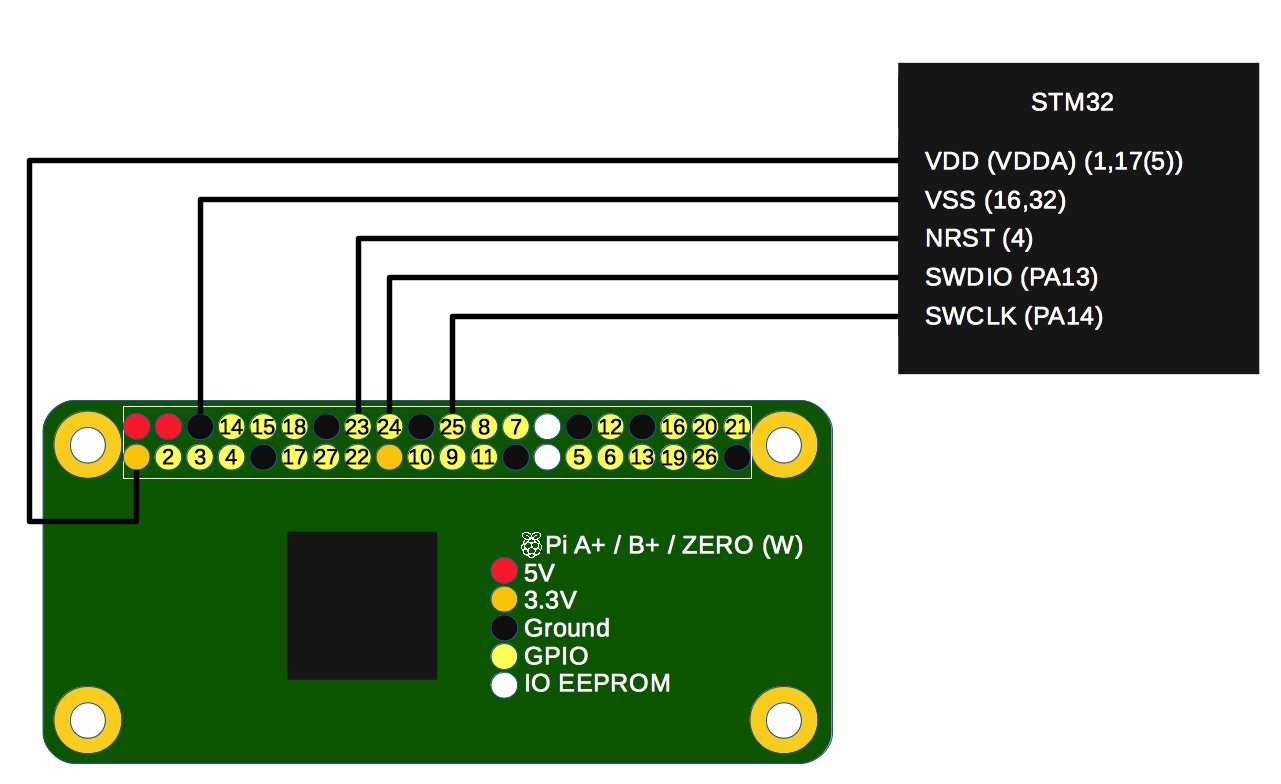
Note that VDD is supplied by the Raspberry Pi voltage regulator, and hence, both the Pi and the STM have the same IO voltage levels. Basis for this guide was this explanation, and shows sysfs is a generic means to use a Single Board Computer, so next to Raspberry Pi as the programming device, also a Beaglebone or any other linux SBC with GPIOs available through sysfs can be used.
About the Reset Signal
The "n" in nSRST indicates reset is done by pulling the reset line "low" (meaning to ground). The STM32 MCU's have a weak pull-up resistor internally built-in, so when no connection is made, the mcu is not reset. Also, the SWD interface seems to be initiated only during reset. This can be examined by pulling the reset pin to ground permenently, and then connecting the SWD interface.
About OpenOCD and Reset Configuration
However, getting the reset configuration working can be challenging by the number of options and less concise documentation about this topic (see here). The reset configuration is done by the option:
reset_config mode_flag
The mode_flag options can be specified in any order, but only one of each type. The relevant reset_config settings here are:
- signals type: none (default), trst_only, srst_only and trst_and_srst. SRST refers to system reset (complete mcu reset), and TRST only resets the TAP controller of the mcu.
- gates type: srst_gates_jtag (default) indicates SRST prohibits JTAG. srst_nogate indicates JTAG commands are possible during SRST.
- srst type: srst_open_drain (default), and srst_push_pull. It sets the output type of the reset signal.
- connect type: connect_deassert_srst (default) indicates that SRST may not be active while connecting to the target. The opposite option is connect_assert_srst, which indicates that SRST must be active before any target connection is made. STM32 and STR9 use this.
Given the explanation above, the working combination for sysfs and the STM32 sereies MCU's is:
reset_config srst_only

reset_config srst_nogate

reset_config_srst_open_drain

reset_config connect_assert_srst
Double check the actual parameters used by examining the openocd output. Tip: troubleshooting with an LED may be necessary, and be aware that SWD connection seems to be mcu and reset configuration dependant.
Raspberry Pi as JTAG Adapter
Now, there are two methods to use the GPIO's of the Raspberyy Pi. The first is to use sysfs, the generic means to to bitbanging, also useable on fir instance the Beaglebone. The second is using the BCM chip driver, a more native low-level and faster way. Both are tested and explained here. For both of them to be working, the correct version of openocd needs to be installed first.
Installing OpenOCD
OpenOCD needs to be compiled with the sysfs and/or BCM driver in order to use the Raspberry Pi as JTAG / SWD adapter. For Debian based releases (like Raspbian is), this is fortunately done starting with openocd v0.10. Unfortunately, at the time of writing of this tutorial, this version is available in the "buster" release of Debian, which is currently in "testing" phase and not yet the standard Raspbian release. See this overview of the available openocd versions and in which Debian releases they are available. There are several options from here on to optain the correctly compiled openocd, ranging from:
- Running a mixed Debian system where an official Debian repository from a future release is added to the repository index (the often quoted as preferred option, see note 1 at the bottom of this page)
- Compiling yourself from source code (which takes quite some steps and if all done well about 30 muntes), see note 2) at the bottom of this page.
- Download and installing the official openocd version from a future release manually (which does not get auto-updated obviously, but comparable to compiling from source code although way faster and less error-prone)
- Running a recent-enough version of Raspbain (Again, see this overview).
In the latter case, it simply means installing openocd the usual way (here via command-line):
sudo apt-get update

sudo apt-get install openocd
Using SysFS
Some adapters were tested before (like the FTDI FT232H adapter), but especially the resistor hack used is a bit fiddly to work with and seems to be a hit-and-miss depending on your system used. In the end, this was not working reliably when using SWD (where in the case of the FT232H resistor hack, the in and out datalines are shorted through a resistor to make the SWDIO bi-directional connection via the standard JTAG in/out lines. A more elegant, and universal solution (at least using linux systems), is making use of the sysfs to control GPIO's of a board line Beaglebone or Raspberry Pi. The sysfs system is a way to access hardware and software through the filesystem by just reading and writing to/from files. The bi-directional data signal is managed by sysfs by alternating the GPIO between in -and output.
The openocd.cfg file
A complete working configureation file is given here. Note the gpio pins used:
interface sysfsgpio


# minimal swd setup

sysfsgpio_swdio_num     24

sysfsgpio_swclk_num     25

sysfsgpio_srst_num      23


transport select swd


reset_config srst_only

reset_config srst_nogate

reset_config connect_assert_srst


source [find target/stm32f0x.cfg]


adapter_nsrst_delay 100

adapter_nsrst_assert_width 100


init

targets

reset halt
Bitbanging Starts Here
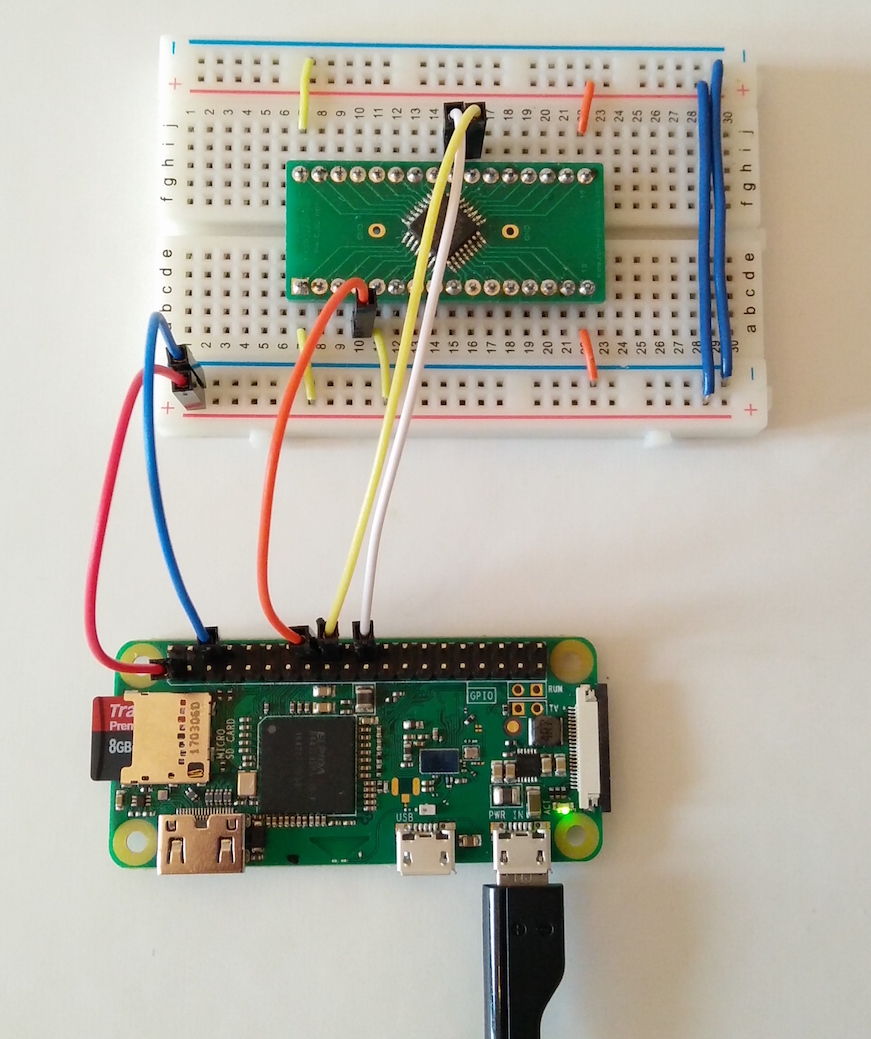
With the openocd.cfg file above, the STM32 can be connected to the Raspberry Pi:
Programming or debugging can start by simply starting openocd (as root), after ssh-ing into the raspberrry pi (for headless systems, meaning without a monitor and keyboard), or directly by opening a terminal on the Raspberry Pi:
pi@raspberrypi:~ $ sudo openocd

Open On-Chip Debugger 0.10.0+dev-00197-g2168c475 (2017-10-07-18:12)

Licensed under GNU GPL v2

For bug reports, read

	http://openocd.org/doc/doxygen/bugs.html

SysfsGPIO num: swdio = 24

SysfsGPIO num: swclk = 25

SysfsGPIO num: srst = 23

srst_only separate srst_gates_jtag srst_open_drain connect_deassert_srst

srst_only separate srst_nogate srst_open_drain connect_deassert_srst

srst_only separate srst_nogate srst_open_drain connect_assert_srst

adapter speed: 1000 kHz

adapter_nsrst_delay: 100

srst_only separate srst_nogate srst_open_drain connect_assert_srst

cortex_m reset_config sysresetreq

adapter_nsrst_delay: 100

adapter_nsrst_assert_width: 100

Info : SysfsGPIO JTAG/SWD bitbang driver

Info : SWD only mode enabled (specify tck, tms, tdi and tdo gpios to add JTAG mode)

Info : This adapter doesn't support configurable speed

Info : SWD DPIDR 0x0bb11477

Info : stm32f0x.cpu: hardware has 4 breakpoints, 2 watchpoints

    TargetName         Type       Endian TapName            State

--  ------------------ ---------- ------ ------------------ ------------

 0* stm32f0x.cpu       cortex_m   little stm32f0x.cpu       reset

Error: Translation from khz to jtag_speed not implemented

in procedure 'reset' called at file "openocd_sysfs.cfg", line 40

in procedure 'ocd_bouncer'

in procedure 'ocd_process_reset'

in procedure 'ocd_process_reset_inner' called at file "embedded:startup.tcl", line 248

in procedure 'stm32f0x.cpu' called at file "embedded:startup.tcl", line 286

in procedure 'ocd_bouncer'


target halted due to debug-request, current mode: Thread

xPSR: 0xc1000000 pc: 0x080023a4 msp: 0x20001ffc
This shows that openocd correctly halted the STM32, and that there are 4 breakpoints and two watchpoints available. From here on, openocd can be used to program the mcu, or be debugged with dbg. See this tutorial how to do baremetal programming of the STM32 using gnu gcc tools.
Using bcm2835gpio
The other method of doing GPIO bit twiddling is using the more native bcm2835 driver. The advantage here is that the out-of-the-box openocd package from Raspbian can be used. In brief, just install openocd via:
apt-get install openocd
Then use following config file (at least, for the Raspberry Pi Zero W used here):
source [find interface/raspberrypi-native.cfg]


transport select swd


source [find target/stm32f0x.cfg]

bcm2835gpio_swd_nums 25 24

bcm2835gpio_srst_num 23


reset_config srst_only

reset_config srst_nogate

reset_config srst_open_drain

reset_config connect_assert_srst


adapter_nsrst_delay 100

adapter_nsrst_assert_width 100


init

targets

reset halt
And now, using openocd should show the following:
pi@raspberrypi:~ $ sudo openocd

Open On-Chip Debugger 0.10.0+dev-00197-g2168c475 (2017-10-07-18:12)

Licensed under GNU GPL v2

For bug reports, read

	http://openocd.org/doc/doxygen/bugs.html

BCM2835 GPIO config: tck = 11, tms = 25, tdi = 10, tdo = 9

adapter speed: 1000 kHz

adapter_nsrst_delay: 100

none separate

cortex_m reset_config sysresetreq

BCM2835 GPIO nums: swclk = 25, swdio = 24

BCM2835 GPIO config: srst = 23

srst_only separate srst_nogate srst_open_drain connect_deassert_srst

srst_only separate srst_nogate srst_open_drain connect_deassert_srst

srst_only separate srst_nogate srst_open_drain connect_deassert_srst

srst_only separate srst_nogate srst_open_drain connect_assert_srst

adapter_nsrst_delay: 100

adapter_nsrst_assert_width: 100

Info : BCM2835 GPIO JTAG/SWD bitbang driver

Info : JTAG and SWD modes enabled

Info : clock speed 1006 kHz

Info : SWD DPIDR 0x0bb11477

Info : stm32f0x.cpu: hardware has 4 breakpoints, 2 watchpoints

    TargetName         Type       Endian TapName            State

--  ------------------ ---------- ------ ------------------ ------------

 0* stm32f0x.cpu       cortex_m   little stm32f0x.cpu       reset

adapter speed: 1006 kHz

target halted due to debug-request, current mode: Thread

xPSR: 0xc1000000 pc: 0x080023a4 msp: 0x20001ffc
Note the final reset configuration in the output above: srst_only separate srst_nogate srst_open_drain connect_assert_srst, which is crucial to get SWD working for the STM32. Happy coding. Again, see See this guide for a "Hello World" example.
Notes
Note 1: Running a mixed Debian system
In brief, an additional Debian repository is added to the /etc/apt/sources.list file (the last line below):deb http://mirrordirector.raspbian.org/raspbian/ stretch main contrib non-free rpi
# Uncomment line below then 'apt-get update' to enable 'apt-get source'
#deb-src http://archive.raspbian.org/raspbian/ stretch main contrib non-free rpi
deb http://mirrordirector.raspbian.org/raspbian/ buster main contrib non-free rpi
Be aware of the versions shown in red above. Secondly, an additional file /etc/apt/apt.conf is added to inform the system what is the default release (this ensures that the system is kept per default on the currently installed release):
APT::Default-Release "stretch";
Openocd from the added repository is then installed via the command:
sudo apt-get -t buster install openocd
Note 2: Compiling OpenOCD
OpenOCD has sysfs support, but unfortunatley, is not compiled with this option per default (it's pending a request to add this wish list item at the Debian Package maintainers). The sequency of commands to download, compile and install openocd:sudo apt-get update
sudo apt-get install git autoconf libtool make pkg-config libusb-1.0-0 libusb-1.0-0-dev
git clone git://git.code.sf.net/p/openocd/code openocd-code
cd openocd-code
./bootstrap
./configure --enable-bcm2835gpio --enable-sysfsgpio
make
sudo make install